Configuring Postfix as a proxy in front of Exim MTAs
OpenBSD Version: -
Arch:            All
NSFP:            Uff...
With the recent announcement of RCE in Exim, and patches still being pending, it might be opportune to move existing Exim setups behind another frontend. Postfix, for example.
In this article, I will describe methods to a) add an additional inbound MX using postfix, and b) enabling authenticated email sending with postfix for existing Exim environments.
Transparent additional MX / Inbound Email
Requirements
- Clean VM with Debian 12
- IPv4/IPv6 Address for that box with inbound port tcp/25
- Existing Exim MXes
Initial Situation
DNS:
example.com. IN MX 50 mx01.example.com.
example.com. IN MX 75 mx02.example.com.
mx01.example.com. IN A 203.0.113.5
mx02.example.com. IN A 192.0.2.23
Furthermore, both mx01.example.com and mx02.example.com run a vulnerable Exim.
Configuring mx03.example.com
DNS:
example.com. IN MX 50 mx01.example.com.
example.com. IN MX 75 mx02.example.com.
example.com. IN MX 99 mx03.example.com. ; Add this entry
mx01.example.com. IN A 203.0.113.5
mx02.example.com. IN A 192.0.2.23
mx03.example.com. IN A 198.51.100.12 ; Add this entry
The system should be called mx03.example.com!
# hostname -f
mx03.example.com
Install required software
# apt-get install python3-certbot certbot postfix
Obtain TLS certificates
# certbot certonly --standalone --preferred-challenges http --agree-tos --email contact@example.com -d `hostname -f`
Configure postfix (edit /etc/postfix/main.cf)
# See /usr/share/postfix/main.cf.dist for a commented, more complete version


# Debian specific:  Specifying a file name will cause the first
# line of that file to be used as the name.  The Debian default
# is /etc/mailname.
#myorigin = /etc/mailname

smtpd_banner = $myhostname ESMTP $mail_name (Debian/GNU)
biff = no

# appending .domain is the MUA's job.
append_dot_mydomain = no

# Uncomment the next line to generate "delayed mail" warnings
#delay_warning_time = 4h

readme_directory = no

# See http://www.postfix.org/COMPATIBILITY_README.html -- default to 3.6 on
# fresh installs.
compatibility_level = 3.6


## TLS parameters
# IMPORTANT: Update the path to fit your environment/names!
smtpd_tls_cert_file=/etc/letsencrypt/live/mx03.example.com/fullchain.pem
smtpd_tls_key_file=/etc/letsencrypt/live/mx03.example.com/privkey.pem
smtpd_tls_security_level=may
# This could be better; But well.
smtpd_tls_protocols = !SSLv2, !SSLv3, !TLSv1
smtpd_tls_loglevel = 1

## Enforce TLS to primary; We should have TLS setup, no? If not, set:
# smtp_tls_security_level=may
smtp_tls_CApath=/etc/ssl/certs
smtp_tls_security_level=verify
smtp_tls_verify_cert_match = hostname, nexthop, dot-nexthop
smtp_tls_session_cache_database = btree:${data_directory}/smtp_scache
smtp_tls_loglevel = 1

## Use reject_unverified_recipient to enforce validation of deliverability to prevent backscatter
# messages are denied with 450, i.e., non perm-error
smtpd_relay_restrictions = permit_mynetworks reject_unverified_recipient defer_unauth_destination
myhostname = mx03.example.com
alias_maps = hash:/etc/aliases
alias_database = hash:/etc/aliases
myorigin = /etc/mailname
mydestination = $myhostname, mx03.example.com, localhost.example.com, localhost

## Relay configuration; Add your domains under relay domains
relay_domains = example.com, example.net
# You can optionally hard-code the relay host you want to use; Usually this should
# not be necessary, though.
# relayhost = [mx01.example.com]:25
# Enable soft bouncing, i.e., do not permanently reject mail to ensure no messages
# are lost.
soft_bounce = yes

mynetworks = 127.0.0.0/8 [::ffff:127.0.0.0]/104 [::1]/128
mailbox_size_limit = 0
recipient_delimiter = +
inet_interfaces = all
inet_protocols = all
Restart postfix
# service postfix restart
Test mail sending
In one terminal, run:
# journalctl -f|grep postfix
Then, from your host, use the following script; Please update sender/recipient addresses as appropriate:
#!/usr/bin/env python3
import sys
import time
import datetime
import hashlib
import smtplib
from email.mime.multipart import MIMEMultipart
from email.mime.text import MIMEText

def send_mail(msg):
        srvr = 'mx03.example.com'
        port = 25
        sndr = 'My Sender <test@example.com>'

        s = smtplib.SMTP(host=srvr, port=port)
        # Uncomment this if you did not configure TLS
        s.starttls()
        s.send_message(msg)

def create_message(dst='dst@example.com'):
        msg = MIMEMultipart()
        msg['To']='<'+dst+'>'
        msg['From']='My Sender <test@example.com>'
        msg['Subject']="Test mail"
        msg_text = "Test mail"
        msg.attach(MIMEText(msg_text, 'plain'))

        return msg


msg = create_message()
send_mail(msg)
If mail sending works, you should see the mail accepted and relayed in the log, and ultimately find it in the right inbox wherever these are stored.
Firewalling and Filtering
Next, you must limit access to port tcp/25 on mx01.example.com and mx02.example.com, while still allowing access from mx03.example.com. How you can do this depends on your setup. The easiest way will likely be using iptables, or rules in your local firewall, see the picture below.
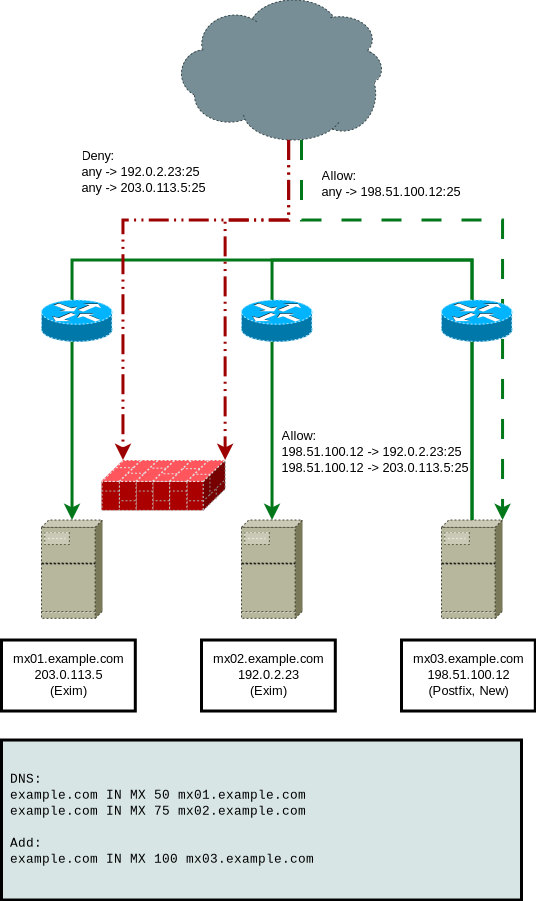
Furthermore, you should make sure that mx01.example.com and mx02.example.com accept emails forwarded by mx03.example.com regardless of their SPF status/spam filtering etc.; This is, of course, not ideal, but the purpose of this activity is mainly to survive until exim patches are out. “Readers are advised to conduct personal risk assessment at their own discretion.”
Caveats
There are some things to keep in mind:
- If you use DANE/TLSA, you will have to add a record for mx03.example.com
- If you use MTA-STS, you need to update your MTA-STS policy
Transparent Authenticated Mail Relaying
To get authenticated mail relaying on a temporary postfix proxy, we will use the IMAP plugin for saslauthd to seamlessly integrate authentication for our proxy.
Requirements
- Clean VM with Debian 12
- IPv4/IPv6 Address for that box with inbound port tcp/465 and tcp/587 in the network segment in which the authenticated relay resides!
- Existing Exim relays
- An IMAP server with the same(!) user/pass syntax as your mail servers!
Initial Situation
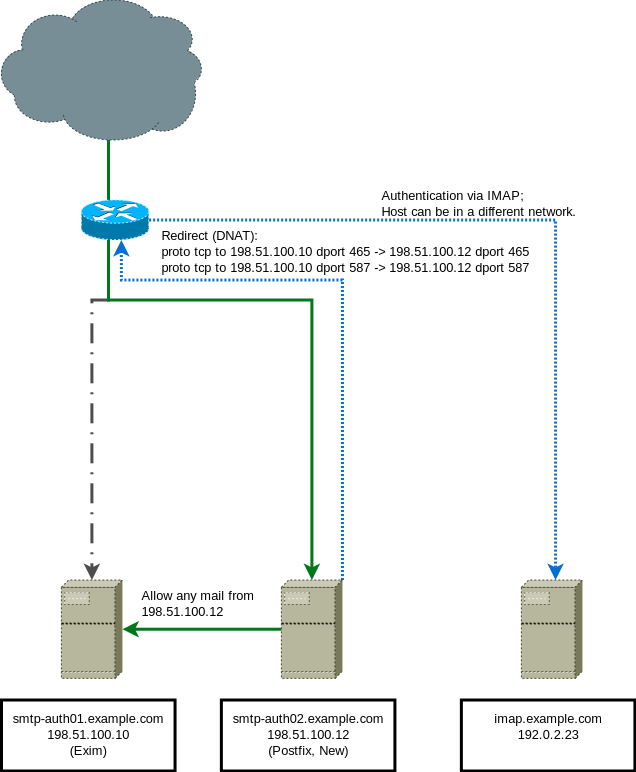
DNS:
smtp-auth01.example.com. IN A 198.51.100.10
imap.example.com. IN A 192.0.2.23
Here, smtp-auth01.example.com runs a vulnerable Exim.
Configuring smtp-auth02.example.com
DNS:
smtp-auth01.example.com. IN A 198.51.100.10
smtp-auth02.example.com. IN A 198.51.100.12
imap.example.com. IN A 192.0.2.23
The new system should be called smtp-auth02.example.com.
# hostname -f
smtp-auth02.example.com
Install required software
# apt-get install postfix libsasl2-modules sasl2-bin stunnel net-tools
Obtain TLS certificates
Copy the TLS certificates of smtp-auth01.example.com over to smtp-auth02.example.com.
Setup stunnel for IMAP
Sadly, the rimap feature of saslauthd does not support TLS.
Hence, to use it, we must use stunnel to connect to the remote IMAP server and bind a non-TLS port to localhost.
Add the following to /etc/stunnel/imap_example_com.conf:
setuid = stunnel4
setgid = stunnel4

#pid = /var/run/stunnel.pid

[exmpl-imap]
client = yes
accept = 127.0.0.1:143
connect = imap.example.com:993
verifyChain = yes
CApath = /etc/ssl/certs
checkHost = imap.example.com
OCSPaia = yes
After adding the config file, restart stunnel:
service stunnel4 restart
Thereafter, stunnel should be listening on lo:
# netstat -an | grep 143
tcp        0      0 127.0.0.1:143           0.0.0.0:*               LISTEN
Setup SASL authentication
Next, we have to configure saslauthd.
There is a good summary on the tool in the debian wiki;
To make it quick:
Create /etc/postfix/sasl/smtpd.conf (we are assuming you only support login and plain):
pwcheck_method: saslauthd
mech_list: LOGIN PLAIN
Create /etc/default/saslauthd-postfix:
DESC="Postfix reverse IMAP SASL Authentication Daemon"
NAME="saslauthd-postfix"
START=yes
MECHANISMS="rimap"
MECH_OPTIONS="127.0.0.1"
THREADS=5
OPTIONS="-c -m /var/spool/postfix/var/run/saslauthd"
Setup SASL requirements
Create a missing directory and add postfix to the sasl group:
# dpkg-statoverride --add root sasl 710 /var/spool/postfix/var/run/saslauthd
# adduser postfix sasl
Restart and test SASL authd
# service saslauthd restart
After starting saslauthd, you should not only see it running in ps aux, but should also be able to authenticate.
# testsaslauthd -u validmailuser -p validpassword -f /var/spool/postfix/var/run/saslauthd/mux
0: OK "Success."
While an invalid password should of course not work:
# testsaslauthd -u validmailuser -p invalidpassword -f /var/spool/postfix/var/run/saslauthd/mux
0: NO "authentication failed"
Configure postfix (edit /etc/postfix/main.cf)
Be aware, we are making this look like it is smtp-auth01!
# See /usr/share/postfix/main.cf.dist for a commented, more complete version


# Debian specific:  Specifying a file name will cause the first
# line of that file to be used as the name.  The Debian default
# is /etc/mailname.
#myorigin = /etc/mailname

smtpd_banner = $myhostname ESMTP $mail_name (Debian/GNU)
biff = no

# appending .domain is the MUA's job.
append_dot_mydomain = no

# Uncomment the next line to generate "delayed mail" warnings
#delay_warning_time = 4h

readme_directory = no

# See http://www.postfix.org/COMPATIBILITY_README.html -- default to 3.6 on
# fresh installs.
compatibility_level = 3.6


## TLS parameters
smtpd_tls_cert_file=/etc/letsencrypt/live/smtp-auth01.example.com/fullchain.pem
smtpd_tls_key_file=/etc/letsencrypt/live/smtp-auth01.example.com/privkey.pem
smtpd_tls_security_level=may
smtpd_tls_protocols = !SSLv2, !SSLv3, !TLSv1
smtpd_tls_loglevel = 1

## Enforce TLS to primary
smtp_tls_CApath=/etc/ssl/certs
smtp_tls_security_level=verify
smtp_tls_verify_cert_match = hostname, nexthop, dot-nexthop
smtp_tls_session_cache_database = btree:${data_directory}/smtp_scache
smtp_tls_loglevel = 1

## Use reject_unverified_recipient to enforce validation of deliverability to prevent backscatter
# messages are denied with 450, i.e., non perm-error
smtpd_relay_restrictions = permit_mynetworks reject_unverified_recipient defer_unauth_destination
myhostname = smtp-auth01.example.com
alias_maps = hash:/etc/aliases
alias_database = hash:/etc/aliases
myorigin = /etc/mailname
mydestination = $myhostname, smtp-auth01.example.com, localhost.example.com, localhost

## SASL configuration
cyrus_sasl_config_path = /etc/postfix/sasl
smtpd_sasl_local_domain = $myhostname
smtpd_sasl_auth_enable = no
broken_sasl_auth_clients = yes
smtpd_sasl_security_options = noanonymous

## Relay configuration
relayhost = smtp-auth01.example.com
# Enable soft bouncing, i.e., do not permanently reject mail to ensure no messages
# are lost.
soft_bounce = yes

## Restriction classes for submission/smtps
smtpd_restriction_classes = mua_sender_restrictions, mua_client_restrictions, mua_helo_restrictions
mua_client_restrictions = permit_sasl_authenticated, reject
mua_sender_restrictions = permit_sasl_authenticated, reject
mua_helo_restrictions = permit

mynetworks = 127.0.0.0/8 [::ffff:127.0.0.0]/104 [::1]/128
mailbox_size_limit = 0
recipient_delimiter = +
inet_interfaces = all
inet_protocols = all
We have multiple options for handling re-injecting authenticated emails.
What we are using here is relaying to smtp-auth01.example.com on port tcp/25,
assuming that this port is available from smtp-auth02.example.com. However,
we could also use a dedicated system account for that.
For configuring postfix with authenticated relaying, please see other resources.
Configure postfix (edit /etc/postfix/master.cf)
In addition to configuring the basic postfix features outlined above, we also
need to enable tcp/465 (smtps) and tcp/587 (submission). We can do that in
/etc/postfix/master.cf, by adding the following lines:
submission     inet  n       -       y       -       -       smtpd
  -o syslog_name=postfix/submission
  -o smtpd_tls_security_level=encrypt
  -o smtpd_sasl_auth_enable=yes
  -o smtpd_tls_auth_only=yes
  -o smtpd_reject_unlisted_recipient=no
  -o smtpd_client_restrictions=$mua_client_restrictions
  -o smtpd_helo_restrictions=$mua_helo_restrictions
  -o smtpd_sender_restrictions=$mua_sender_restrictions
  -o smtpd_recipient_restrictions=
  -o smtpd_relay_restrictions=permit_sasl_authenticated,reject
smtps     inet  n       -       y       -       -       smtpd
  -o syslog_name=postfix/smtps
  -o smtpd_tls_wrappermode=yes
  -o smtpd_sasl_auth_enable=yes
  -o smtpd_reject_unlisted_recipient=no
  -o smtpd_client_restrictions=$mua_client_restrictions
  -o smtpd_helo_restrictions=$mua_helo_restrictions
  -o smtpd_sender_restrictions=$mua_sender_restrictions
  -o smtpd_recipient_restrictions=
  -o smtpd_relay_restrictions=permit_sasl_authenticated,reject
Restart and Test postfix
With everything in place, we can restart postfix:
# service postfix restart
If everything comes up clean, we can redirect the mail submission ports to this host (see the figure in the beginning). Technically, you might want to test whether auth+relay actually works before doing so (with the script below); But we are just very trusty people around here, so we guess it works. Also, testing it now would be difficult, as the TLS certificate currently does not match (remember: we took the one from smtp-auth01.example.com). Of course, you should also make sure that there are no other open exim ports.
When the redirect has been put in place, and we are sure mails are successfully pushed to the ‘original’ mail relay (so our hopefully existing toolchain involving dkim etc. does not get bypassed), we can test it with the following script (again, please double check the mail addresses/credentials to make them fit your infra):
#!/usr/bin/env python3
import sys
import time
import datetime
import hashlib
import smtplib
from email.mime.multipart import MIMEMultipart
from email.mime.text import MIMEText

def send_mail(msg):
        srvr = 'smtp-auth01.example.com'
        port = 465
        user = 'mailuser'
        pswd = 'securepassword'
        #pswd = 'awd'
        sndr = 'Mail Sender <external-recipient@example.net>'

        if port == 465:
                s = smtplib.SMTP_SSL(host=srvr, port=port)
                s.login(user, pswd)
        else:
                s = smtplib.SMTP(host=srvr, port=port)
                s.starttls()
                s.login(user, pswd)
        s.send_message(msg)

def create_message(dst='dst@example.com'):

        msg = MIMEMultipart()
        msg['To']='<'+dst+'>'
        msg['From']='Mail Sender <external-recipient@example.net>'
        msg['Subject']="Test mail"
        msg_text = "Test mail"
        msg.attach(MIMEText(msg_text, 'plain'))

        return msg


msg = create_message()
send_mail(msg)
If everything was setup correctly, you should see your mail arriving at the correct destination, and find it having traversed smtp-auth02.example.com and then smtp-auth01.example.com.
It of course always makes sense to test whether mail sending works with https://email-security-scans.org/.
Summary
So, that’s it; Two ways of hiding exim behind postfix.